
Gluten Free Mini Rolls
These gluten free Mini Rolls are an absolute classic for lunchboxes! Chocolate Mini Rolls are basically a fatless sponge, swirled with buttercream and coated in chocolate. This recipe makes 6 but can be doubled up to make 12 using two Swiss roll tins.
Servings: 6 Mini Rolls
Equipment
Ingredients
- 3 large eggs
- 70 g caster sugar
- 35 g cocoa powder
- 3 tbsp boiling water
- 1/2 tsp vanilla extract
For the filling:
- 125 g icing sugar
- 75 g unsalted butter room temperature
- 1 tsp vanilla extract
For the coating:
- 100 g dark chocolate
- 100 g milk chocolate
- 50 g white chocolate
Instructions
- Preheat the oven to 180'C / Fan 160'C / Gas Mark 4. Grease and line a 39cm x 24cm Swiss roll tin and set to one side.
- Add the cocoa powder, boiling water and vanilla extract to a small bowl and mix into a smooth paste.
- Separate the eggs, placing the egg whites in one large mixing bowl and the egg yolks in another.
- Whisk the egg whites (preferably in a metal bowl) using an electric whisk until they form stiff peaks - aka you could turn the bowl upside down and the mixture won't budge.
- As you continue to whisk the egg whites, gradually add 50g of the caster sugar and continue whisking until the mixture is glossy and smooth.
- In your second mixing bowl, add the remaining 25g caster sugar to the egg yolks and whisk until they thicken and become paler in colour. Add the cocoa powder mix and beat again briefly until combined.
- Add a large spoonful of the egg white mixture to the egg yolk mixture and beat together to loosen it.
- Once combined, gradually fold in the remaining egg whites using a metal spoon, being careful not to beat them - you don't want to lose those lovely air bubbles!
- Once completely combined, pour into the lined Swiss roll tin and smooth out using a palette knife. Bake for 12-15 minutes until springy to the touch. Remove from the oven, place on a cooling rack and cover with a damp tea towel until completely cool.
To assemble the Mini Rolls:
- Add the butter, icing sugar and vanilla extract to a bowl and beat together with an electric whisk until fluffy and smooth - it should whiten in colour after around 5 minutes of whisking.
- Turn the cooled sponge out onto the worktop and carefully peel off the baking paper. Score a line about 2-3cm from one of the shortest edges.
- Spread the buttercream over the whole cake in one even layer. Then, starting from the scored edge, roll the sponge in towards the centre of the cake, stopping in the middle.
- Repeat on the other end of the sponge so that you have two rolls like this:
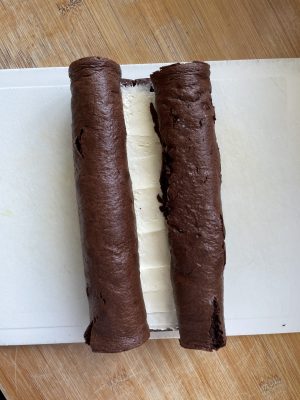
- Cut down the centre of the between the rolls and continue to roll them until they are completely rolled up, seam side down. Using a sharp knife, cut each roll into three (you may like to trim the edges first for a super neat edge).
- Place the Mini Rolls on a cooling rack, seam side down, to firm up while you melt the chocolate.

To coat the Mini Rolls:
- Add the milk and dark chocolate pieces to a heatproof bowl and melt over a pan of simmering water, stirring regularly.
- Either dip the Mini Rolls (they're fragile, so be careful!) into the chocolate one-at-a-time to coat them, or pour the chocolate over the rolls. Once coated, place on a sheet of baking paper.
- Leave the Mini Rolls at room temperature to set. Once set, melt the white chocolate (in the same way as before) and pour into a piping bag. Cut a small hole in the bottom and then pipe lines across the Mini Rolls. Leave to set and then tuck in!
Notes
- Storage: For details on storing, freezing and making this recipe dairy free, check out the FAQs section below this recipe card.
- Step-by-Step Photos: Scroll up for some handy photos showing you exactly how to roll and coat your chocolate Mini Rolls, plus more recipe tips.
- Like this Recipe? It would mean SO much to me if you could leave a 5* rating and tell all your gluten free friends about the chocolate mini rolls!
Nutrition
Serving: 1Mini Roll | Calories: 502kcal | Carbohydrates: 64g | Protein: 6g | Fat: 25g | Saturated Fat: 15g | Polyunsaturated Fat: 9g | Cholesterol: 127mg | Sodium: 63mg | Fiber: 2g | Sugar: 60g
