This post may contain affiliate links for which I earn a small commission at no extra cost to you. For more info, check out my Disclosure Policy. Thank you for your support!
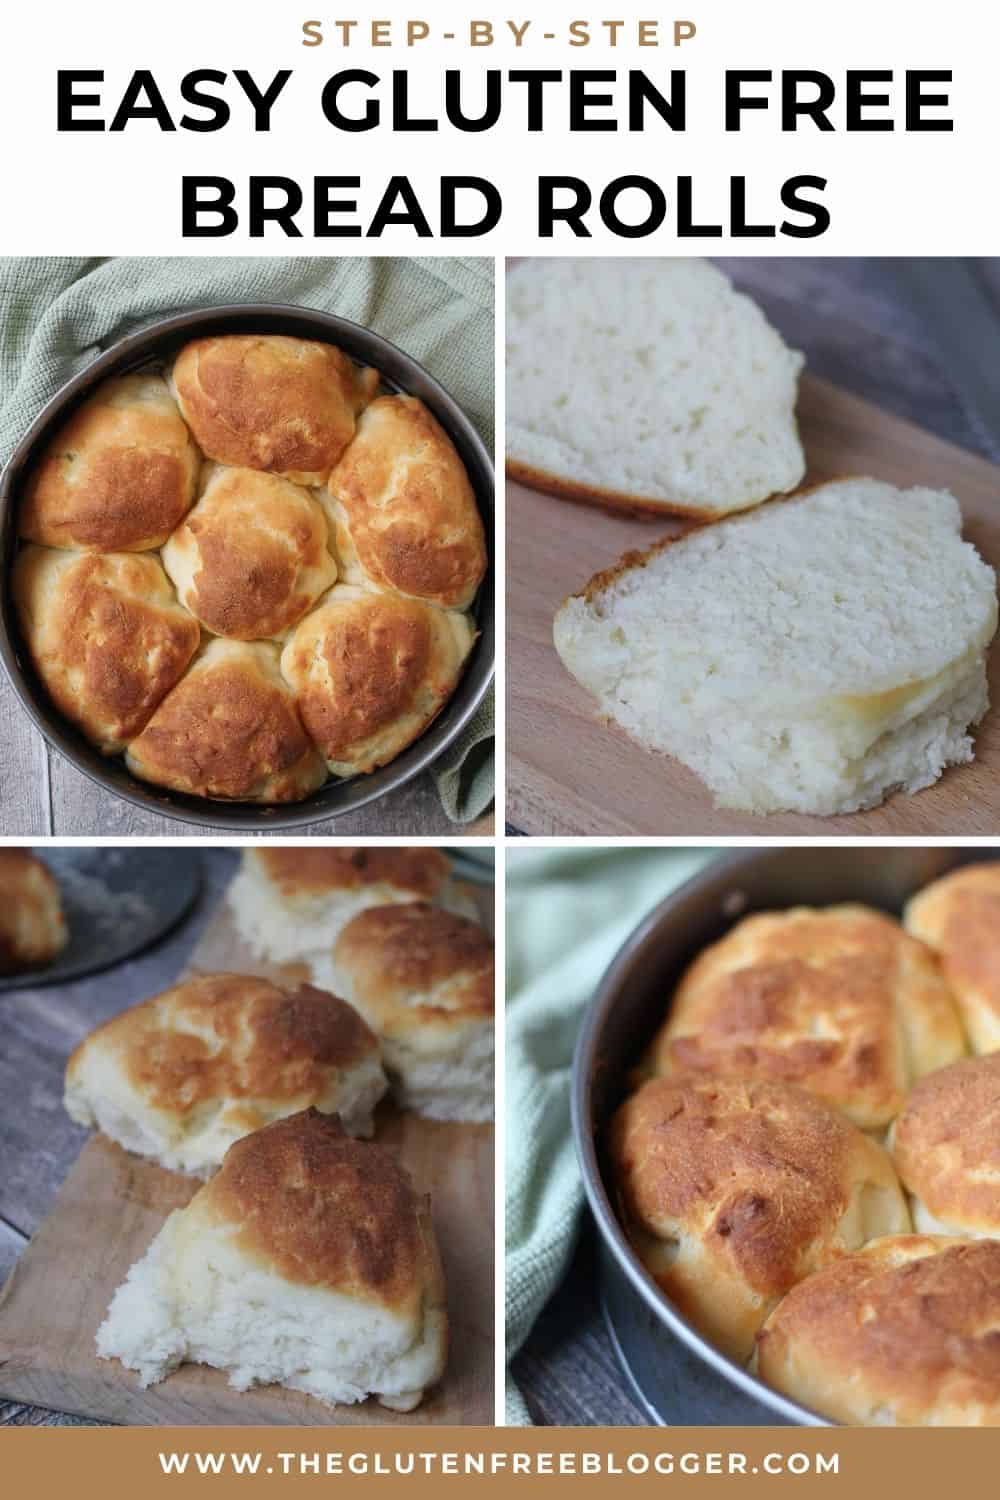
If there’s one recipe I’ve been asked for many times, it’s a gluten free bread rolls recipe and guys, I’ve got the BEST gluten free bread rolls recipe ever!
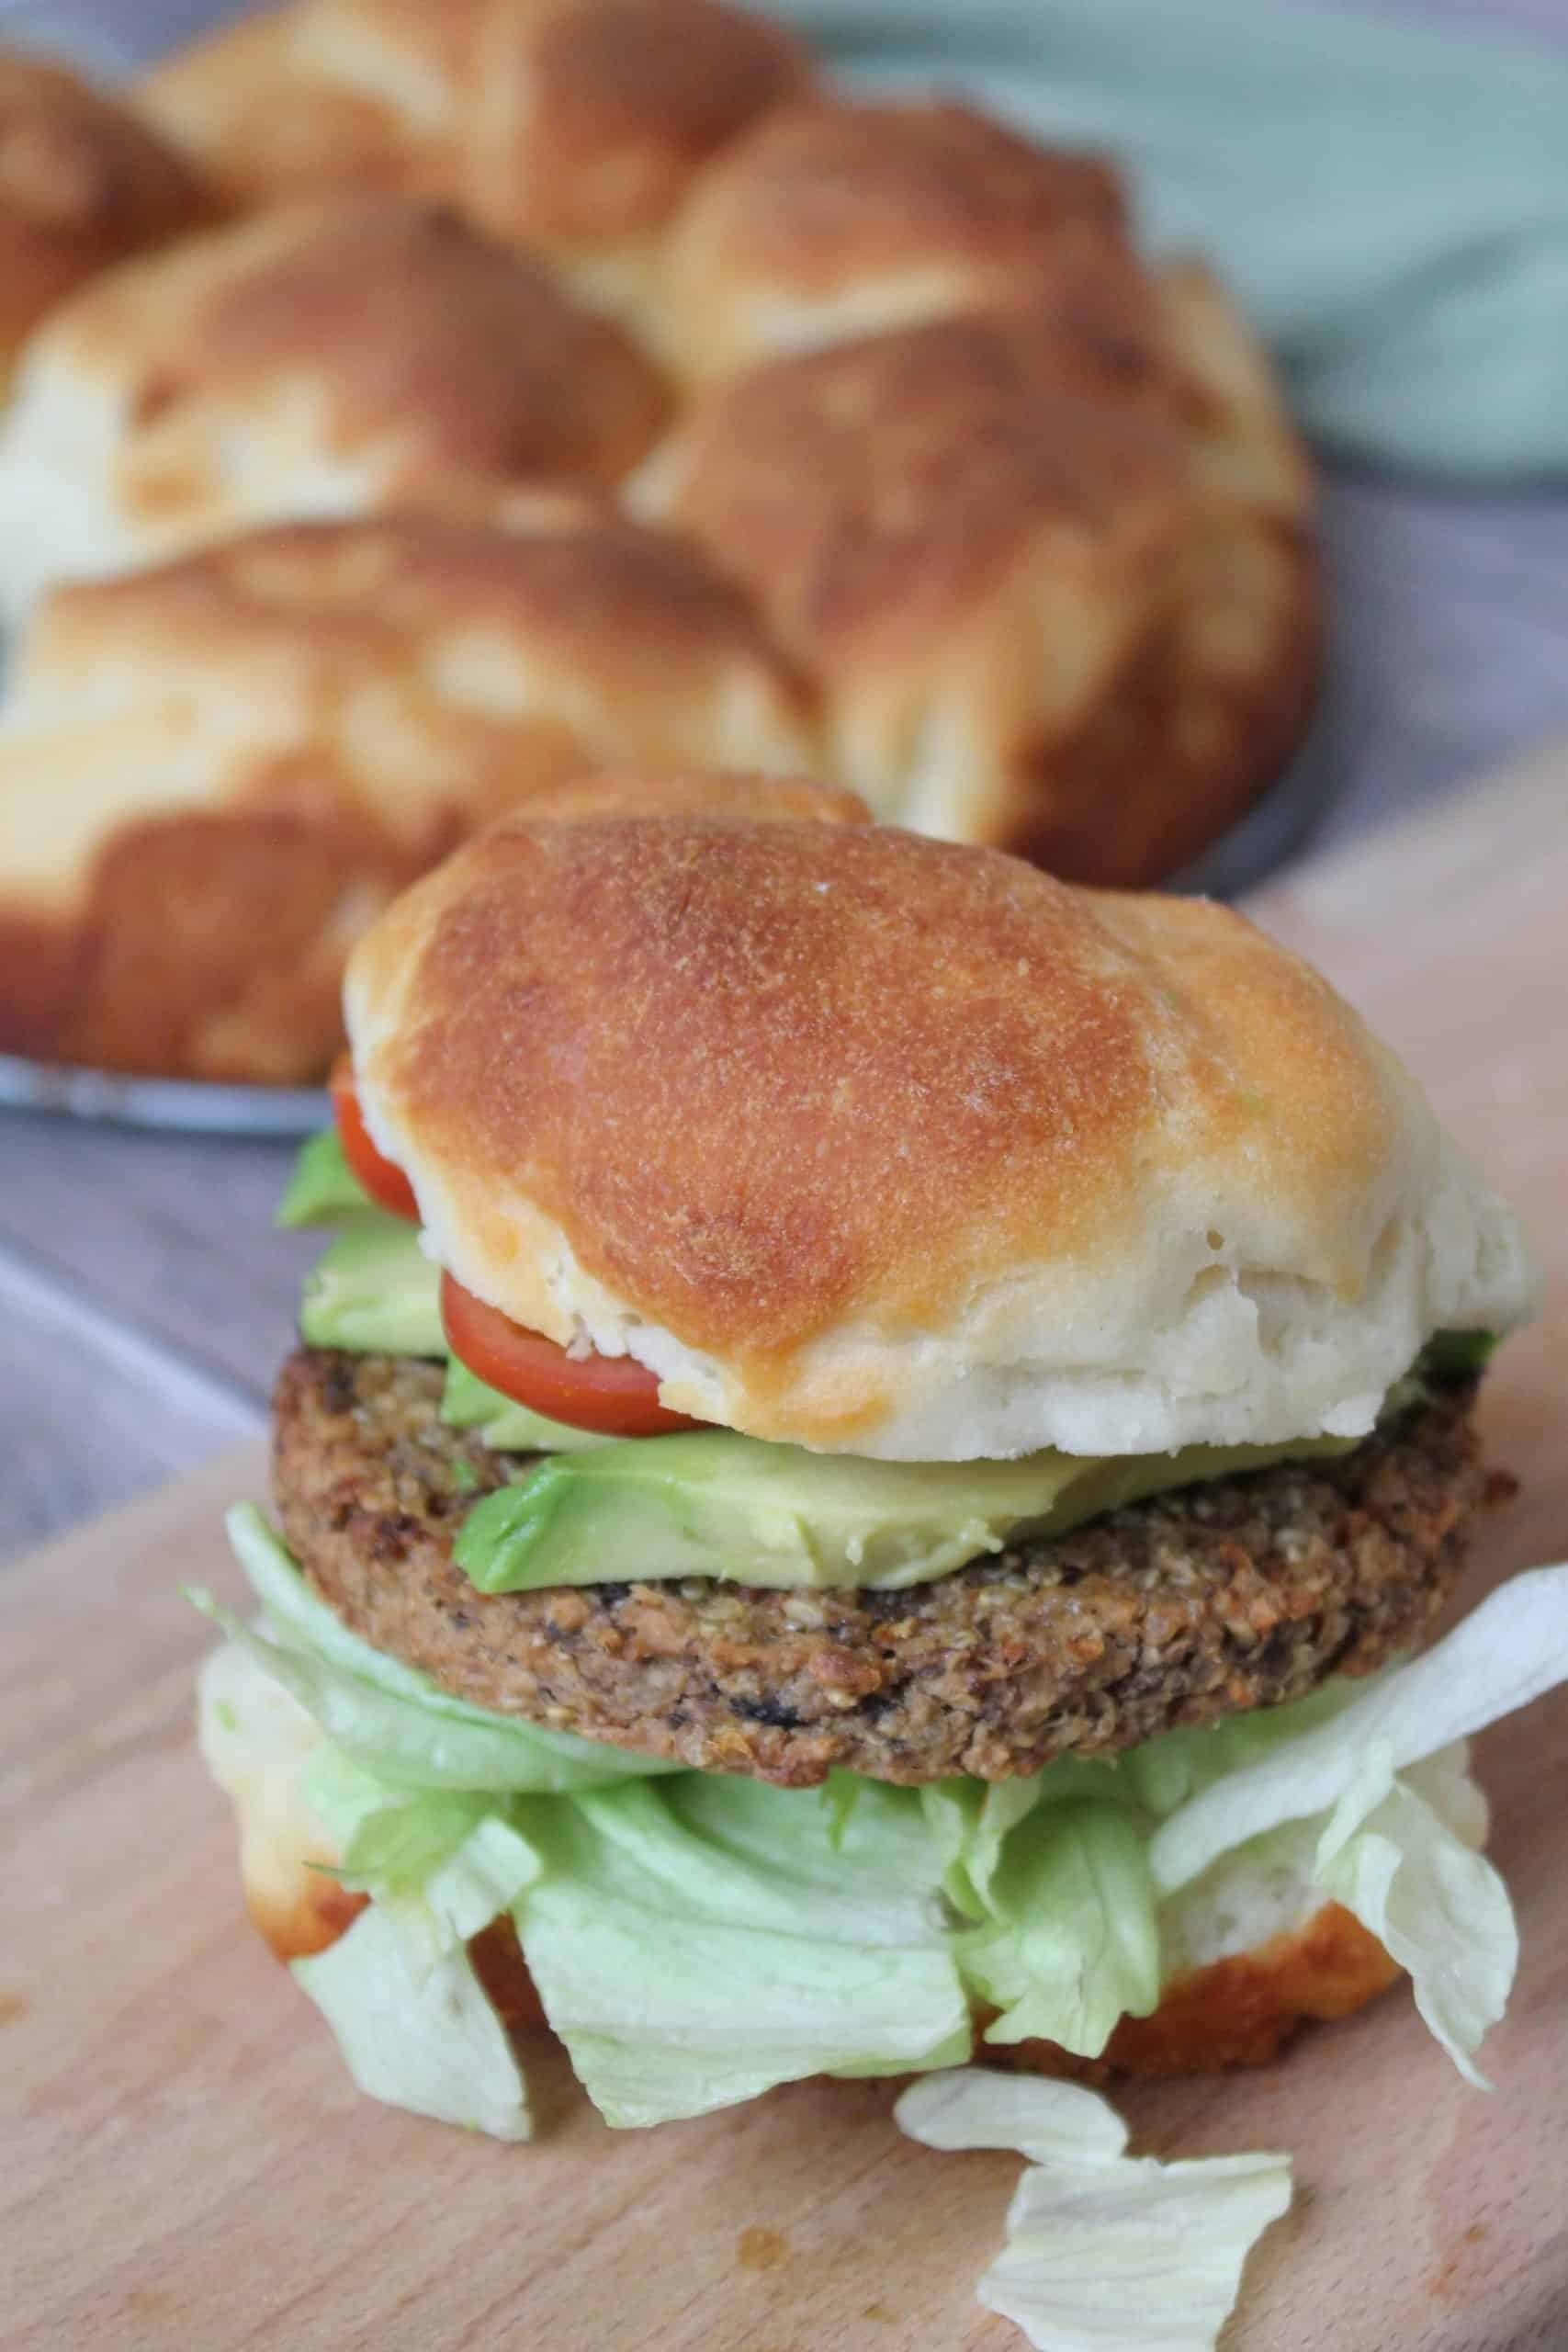
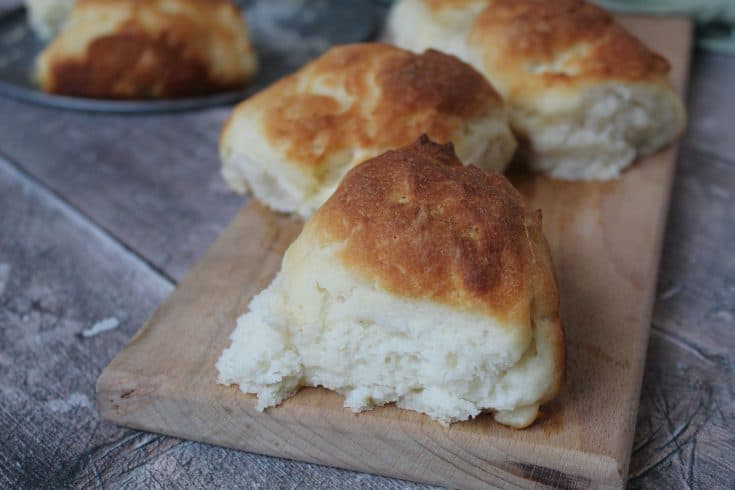
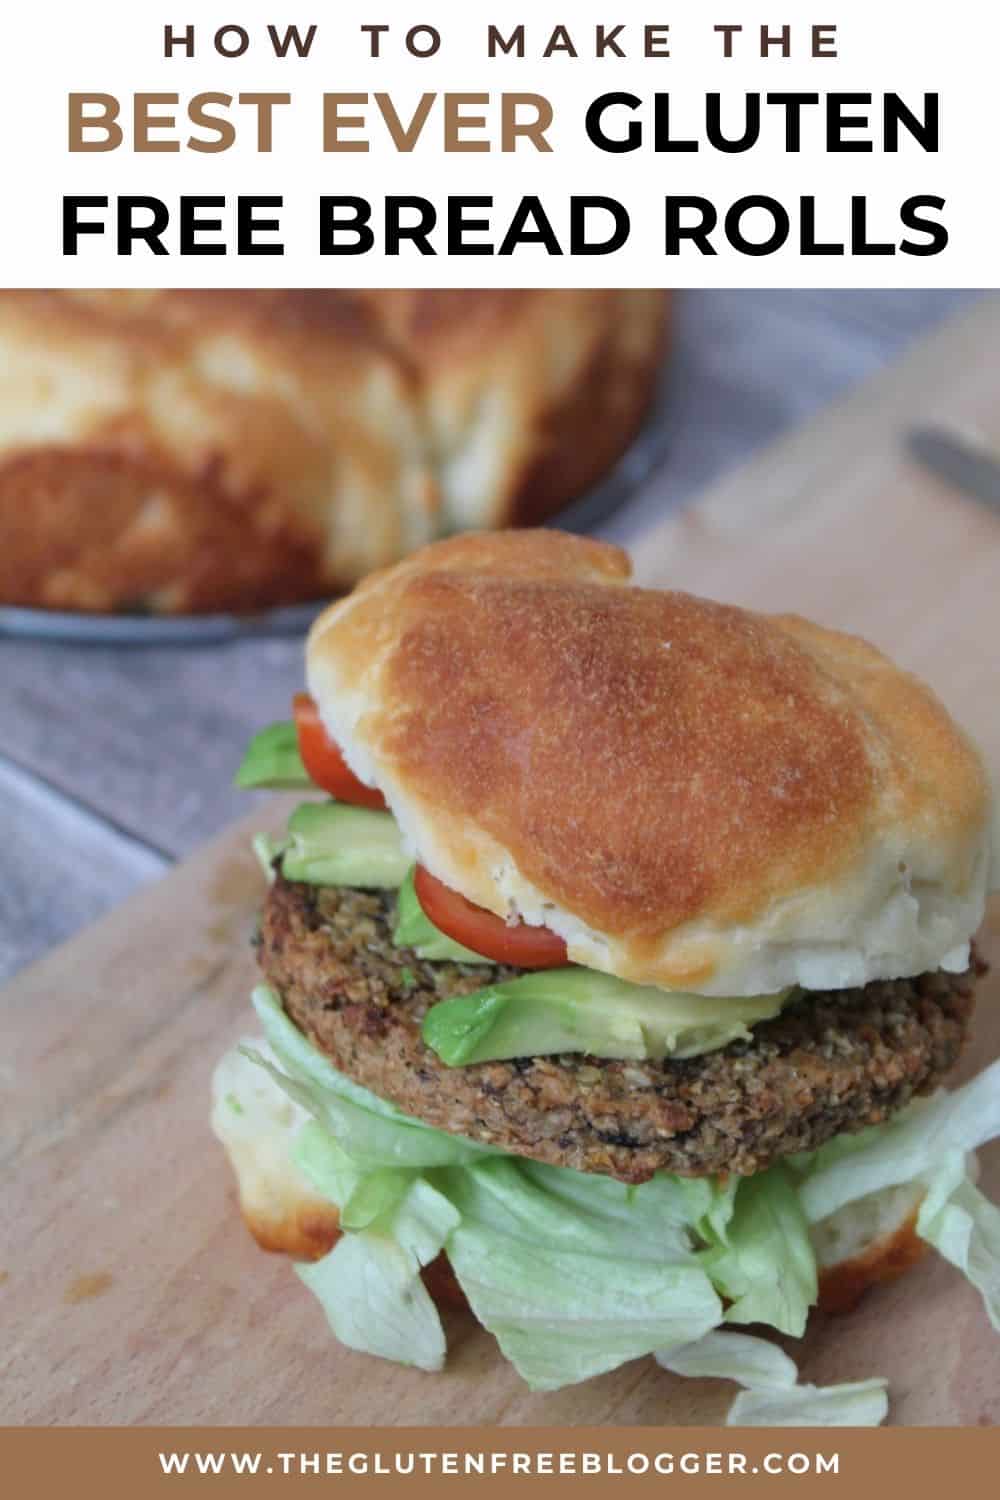
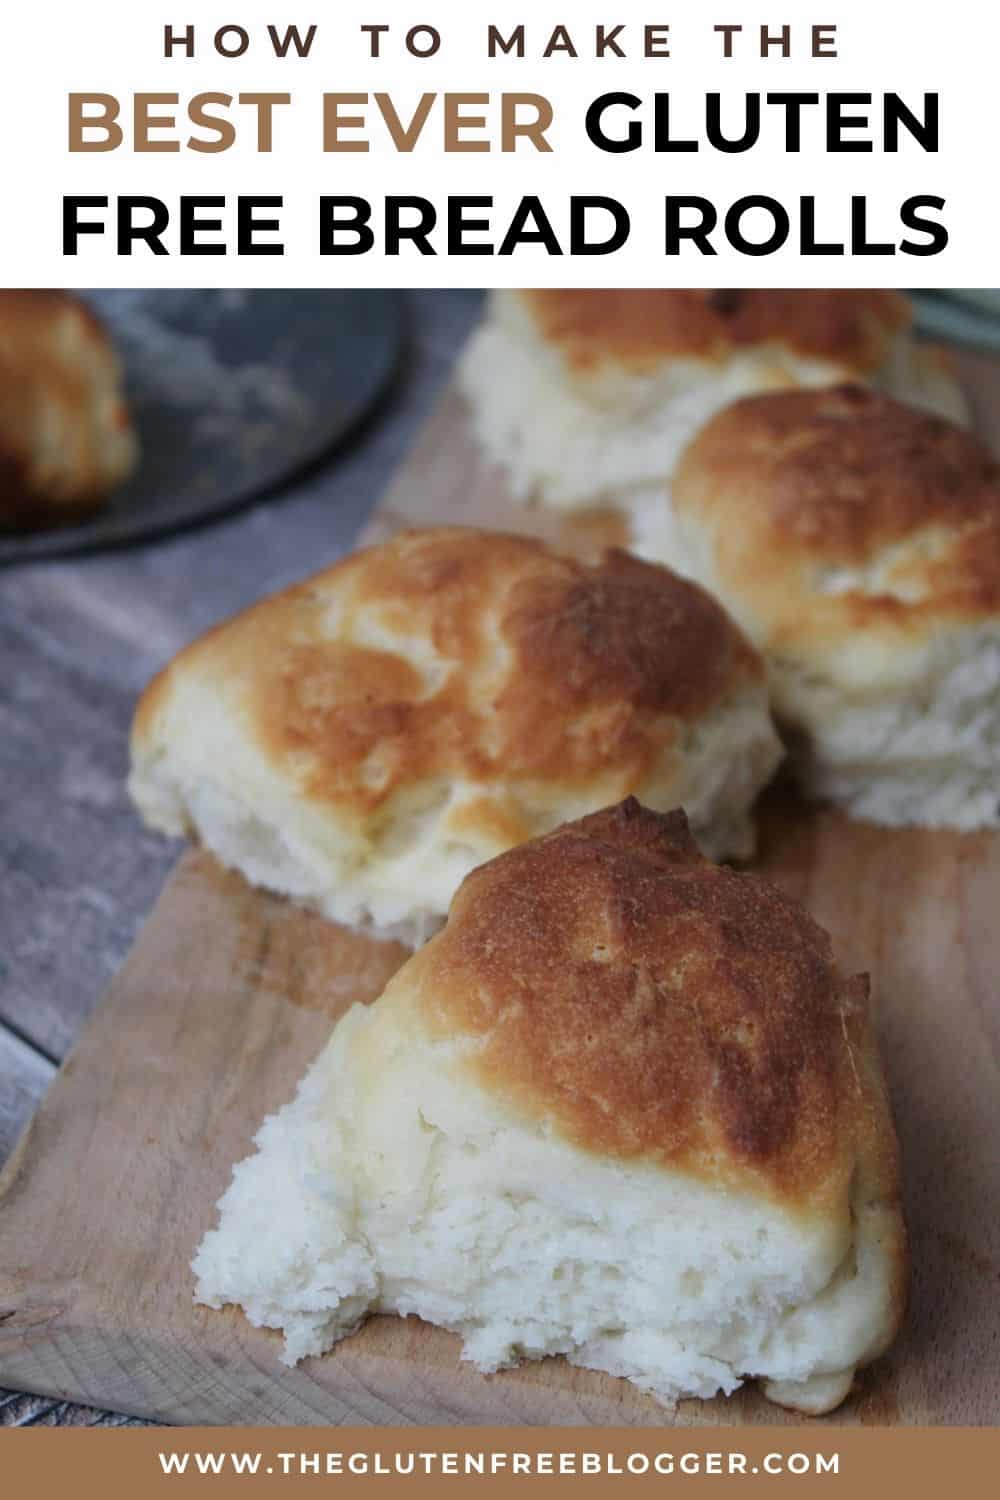
I’m talking soft, doughy gluten free rolls perfect for a lunchbox – which make the perfect gluten free burger buns or gluten free dinner rolls.
I’ve been working on this soft gluten free bread rolls recipe for some time now and guys, I’ve finally cracked it.
I’m honestly SO excited to share this recipe with you! It’s been a labour of love and I don’t think I’ve ever been so proud of anything I’ve made.
The best gluten free dinner rolls
So what makes these gluten free bread rolls so special?
For starters they are super easy to make – they’re very similar to my easy gluten free bread recipe, just not in loaf form.
However, while my bread recipe has a gorgeous crust, these gluten free buns are soft and pillowly.
They’re brushed with melted butter before baking to give them a lovely, soft exterior.
And they’re proper tear-and-share gluten free rolls – you can rip them apart just like those dreamy gluten-filled rolls I gaze longingly at in the bakery aisle.
I also used milk in the dough which helps to improve the texture and makes the gluten free bread last longer.
This is due to the fat content in the milk – I always use full fat cows milk, so be aware if you use a dairy free option they may not keep as well.
What do you need to make gluten free buns?
Making these gluten free bread rolls is super easy and there’s a full printable recipe card down below.
However, for the shopping list you’ll need the following ingredients:
- 300ml milk
- 2 tbsp caster sugar
- 7g dried yeast
- 1 tsp xanthan gum
- 1 tsp salt
- 400g FREEE gluten free white bread flour
- 1 tsp apple cider vinegar
- 5 tbsp vegetable oil (such as rapeseed oil)
- 2 large eggs
- 20g unsalted butter (for brushing)
I always use the FREEE bread flour because I personally find it gives the best finish.
I’ve not tried this recipe using a plain gluten free flour blend – I don’t think it would alter the recipe hugely but it might not be quite the same.
To make this recipe dairy free you could use a dairy free milk alternative and a dairy free butter substitute to brush the rolls before baking.
Eggs are pretty integral to this recipe as they help with the texture of gluten free bread and give it moisture.
I haven’t tested any egg replacements in this so I couldn’t attest to how they’d work – if you do try any then please let me know how you get on!
How to make the BEST gluten free bread rolls
The full method for this recipe is down below but there are a few parts of this gluten free bread rolls recipe which I think were best illustrated through photos.
So here are a few step-by-step photos to guide you through making these gluten free bread rolls.
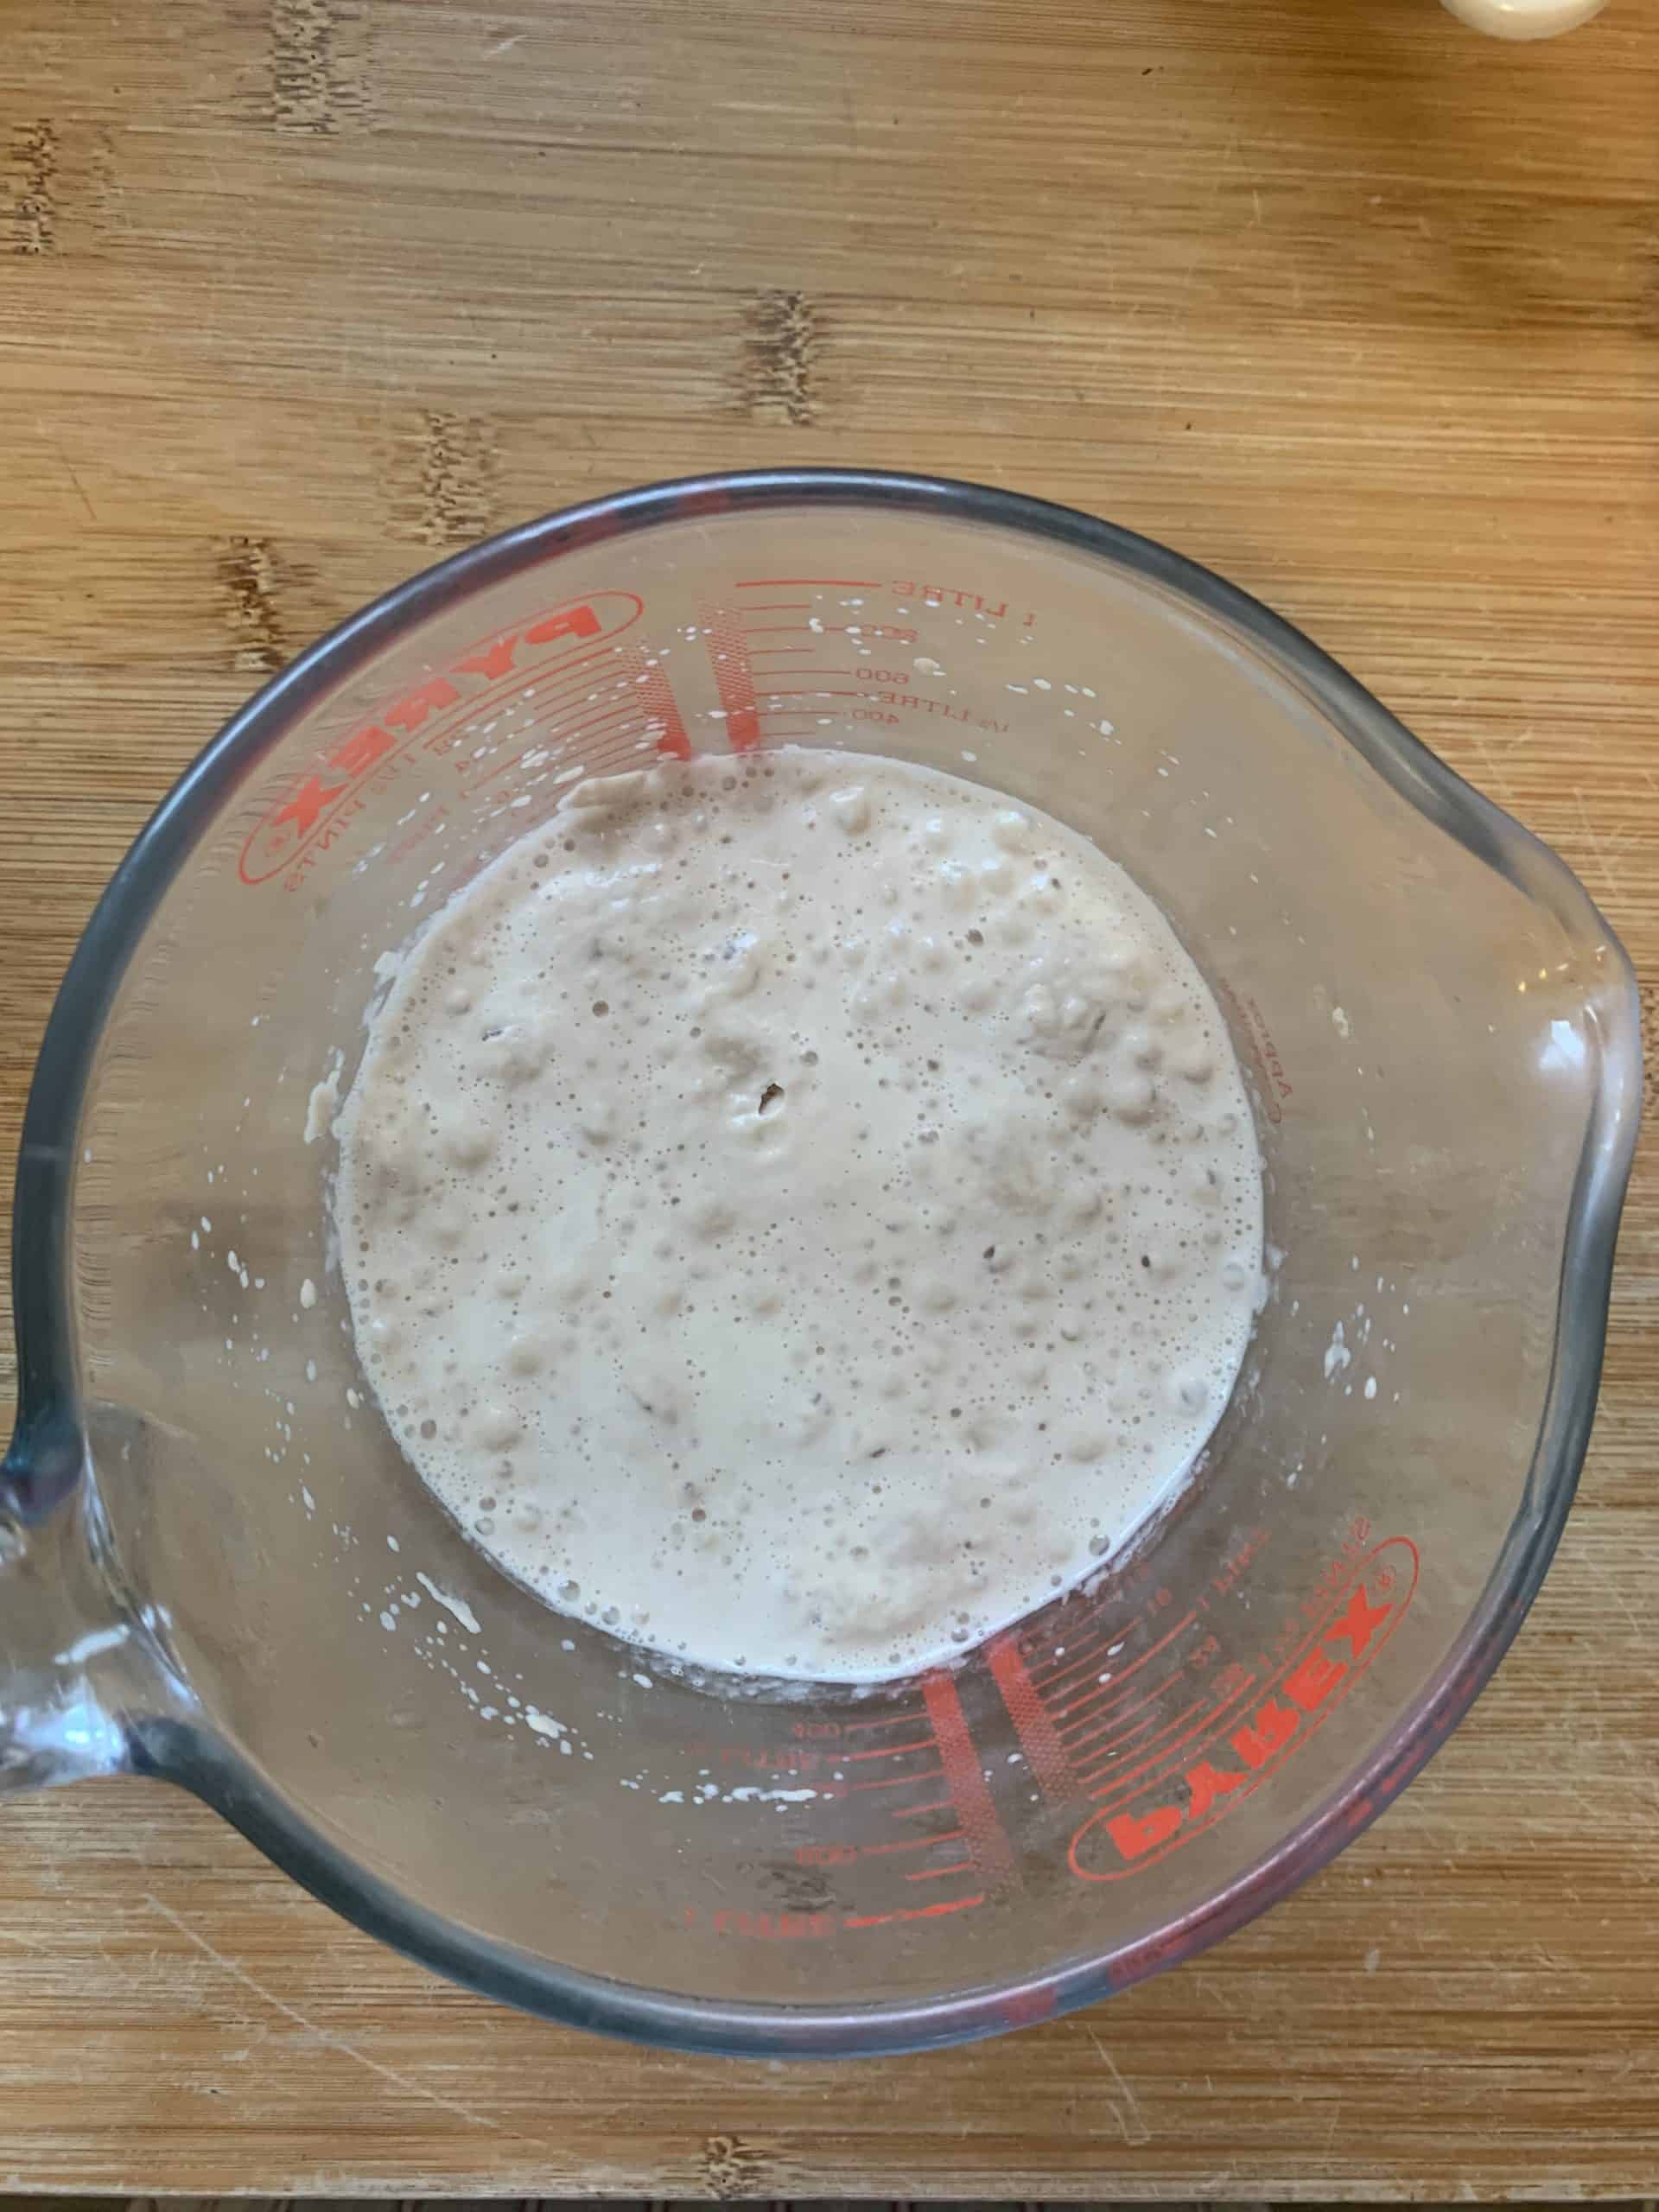
First activate the yeast
To do this, warm the milk so it’s around the same temperature as your skin – i.e. when you put your finger in it, you can’t feel that it’s hot or cold.
Once it’s warm, stir in the sugar then add the yeast – you want a quick yeast for this recipe – and stir.
Cover and leave the yeast mixture for 5-10 minutes and it should form a froth on top, kind of like the head on beer.
If it doesn’t, it’s likely either the milk was too hot and killed the yeast, or your yeast has died.
You’ll need to discard the mixture and start again with fresh yeast – it might be worth checking it’s in date if this doesn’t work.
The frothy yeast mixture should look like this when it’s ready…
Making your gluten free bread dough
The flour and remaining dry ingredients go into one bowl, the wet ingredients are all mixed together separately before you add them to the mix with the yeast mixture.
When you mix everything together, you’ll need a wooden spoon and a bit of elbow grease!
Traditional bread dough is kneadable and stretchy – but gluten free bread dough is very different, more of a thick batter!
This is because it’s the gluten that actually gives dough it’s stretch, hence why making gluten free bread is a whole different beast!
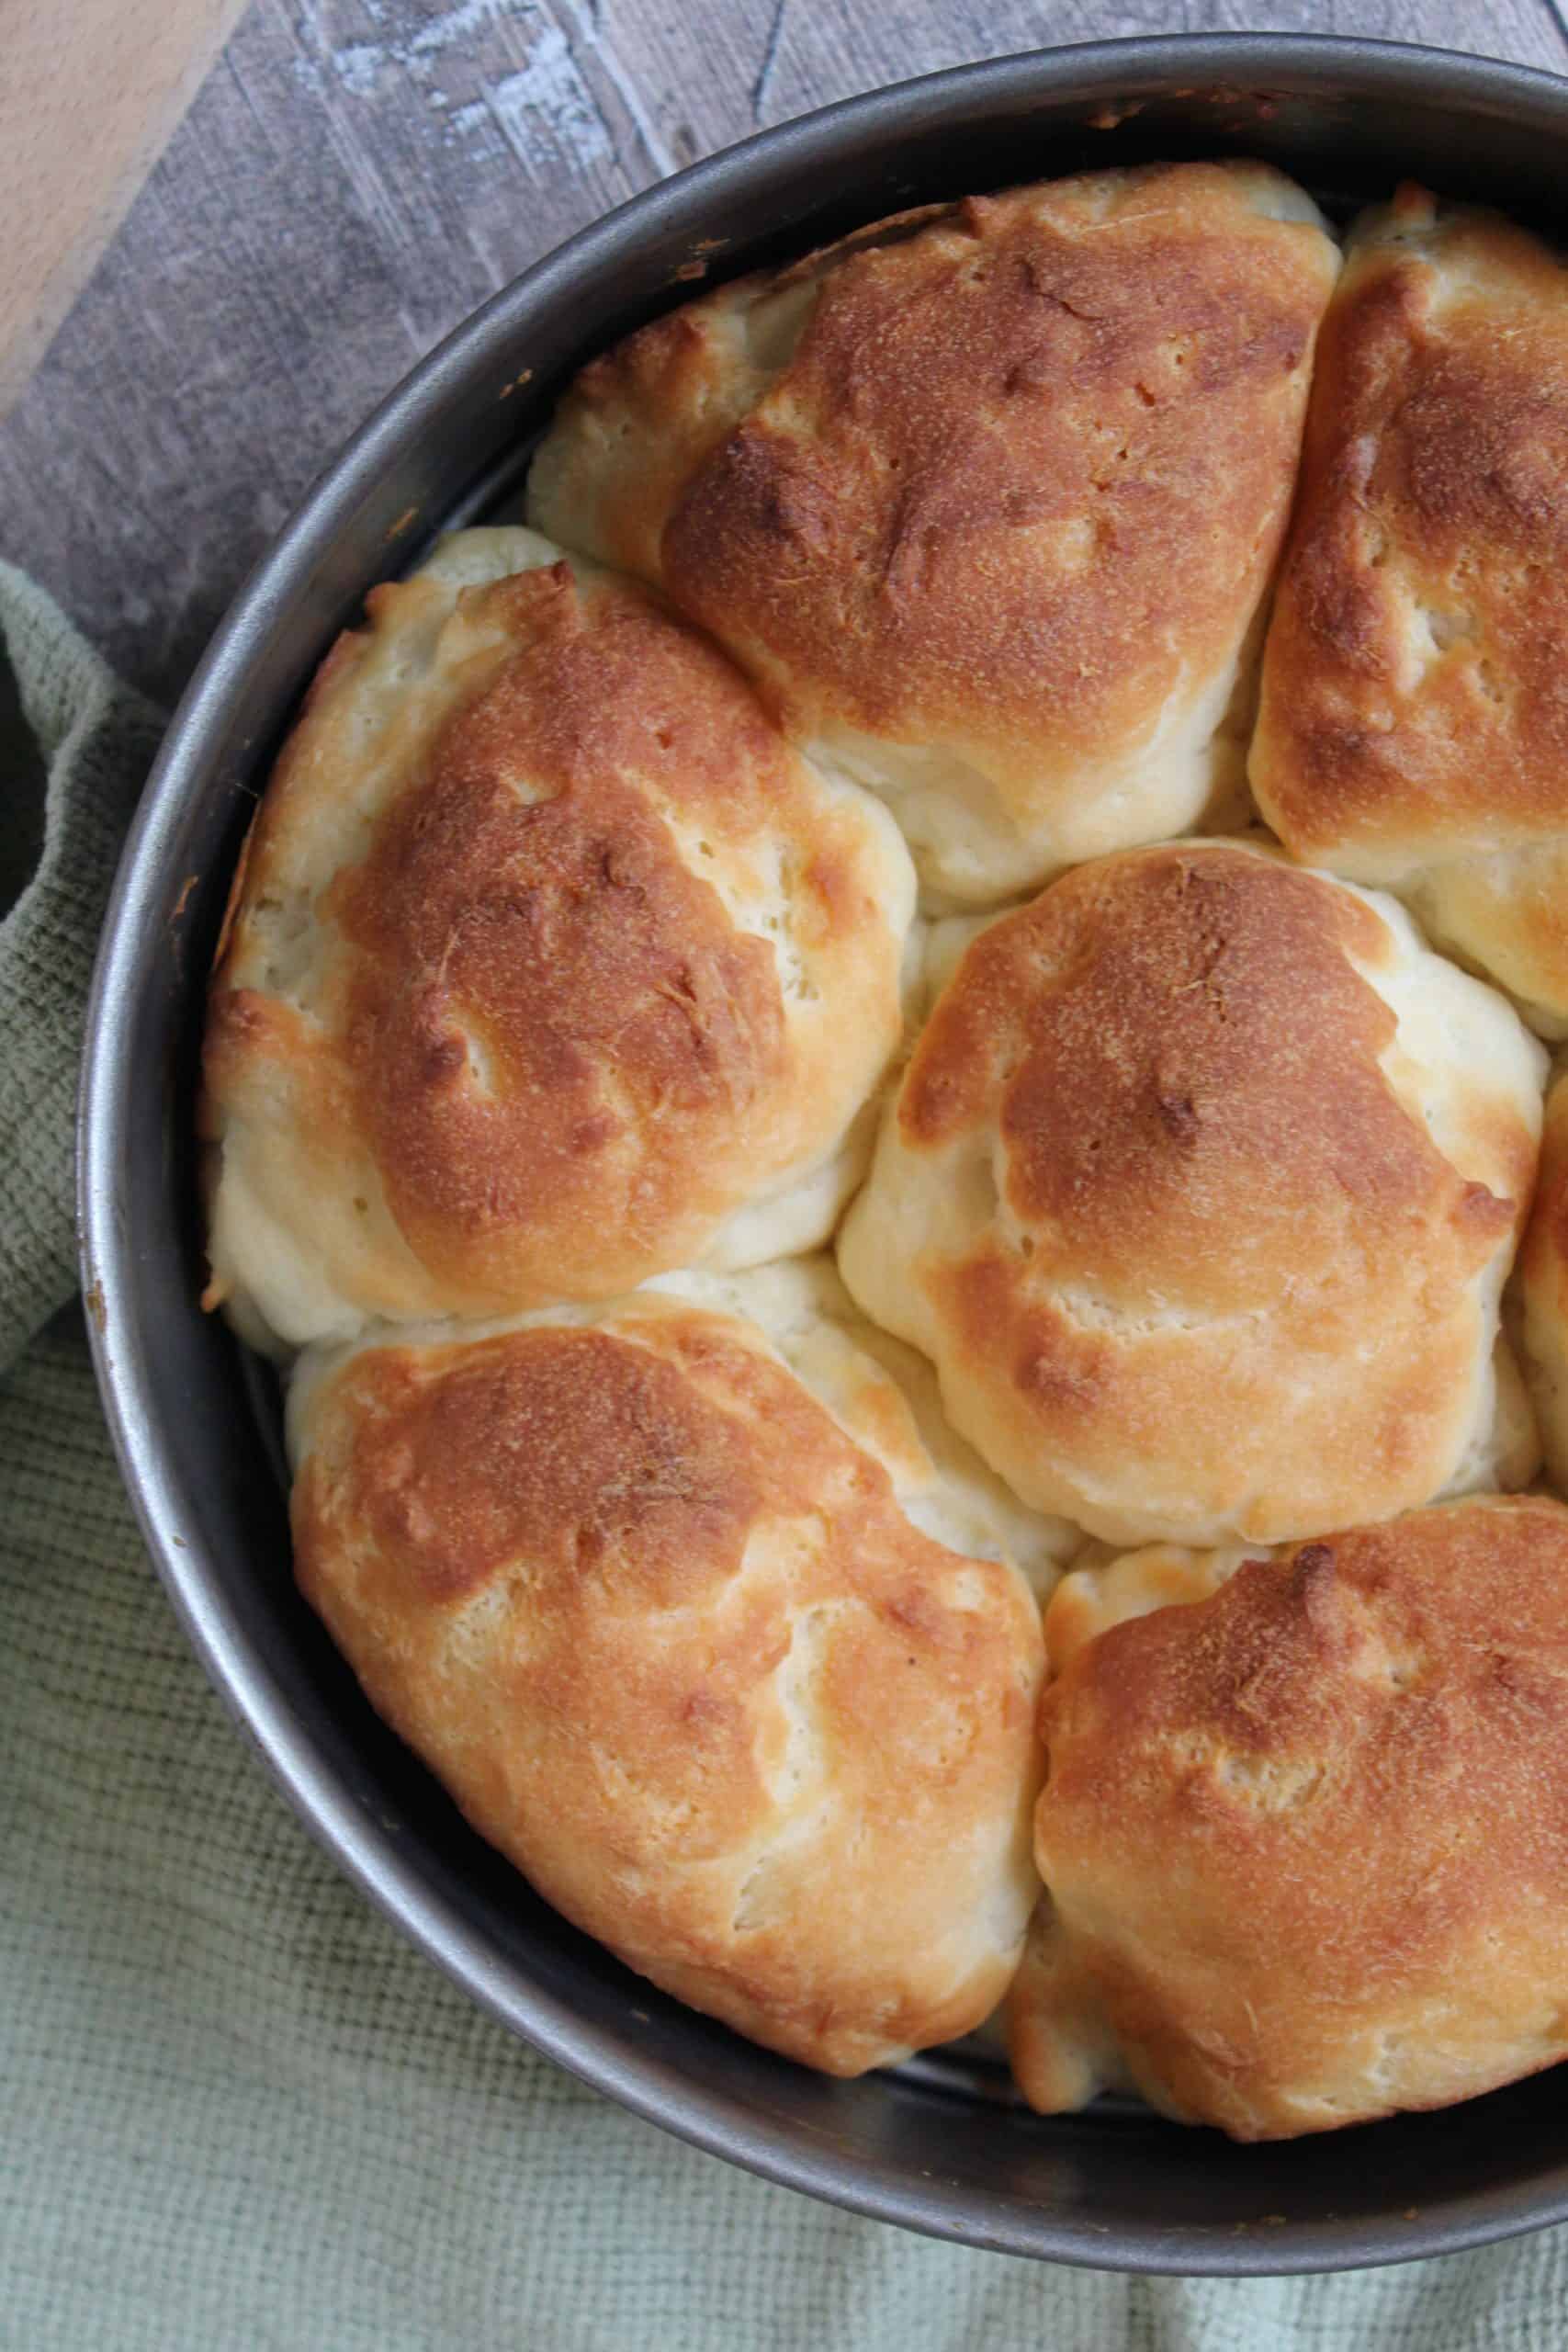
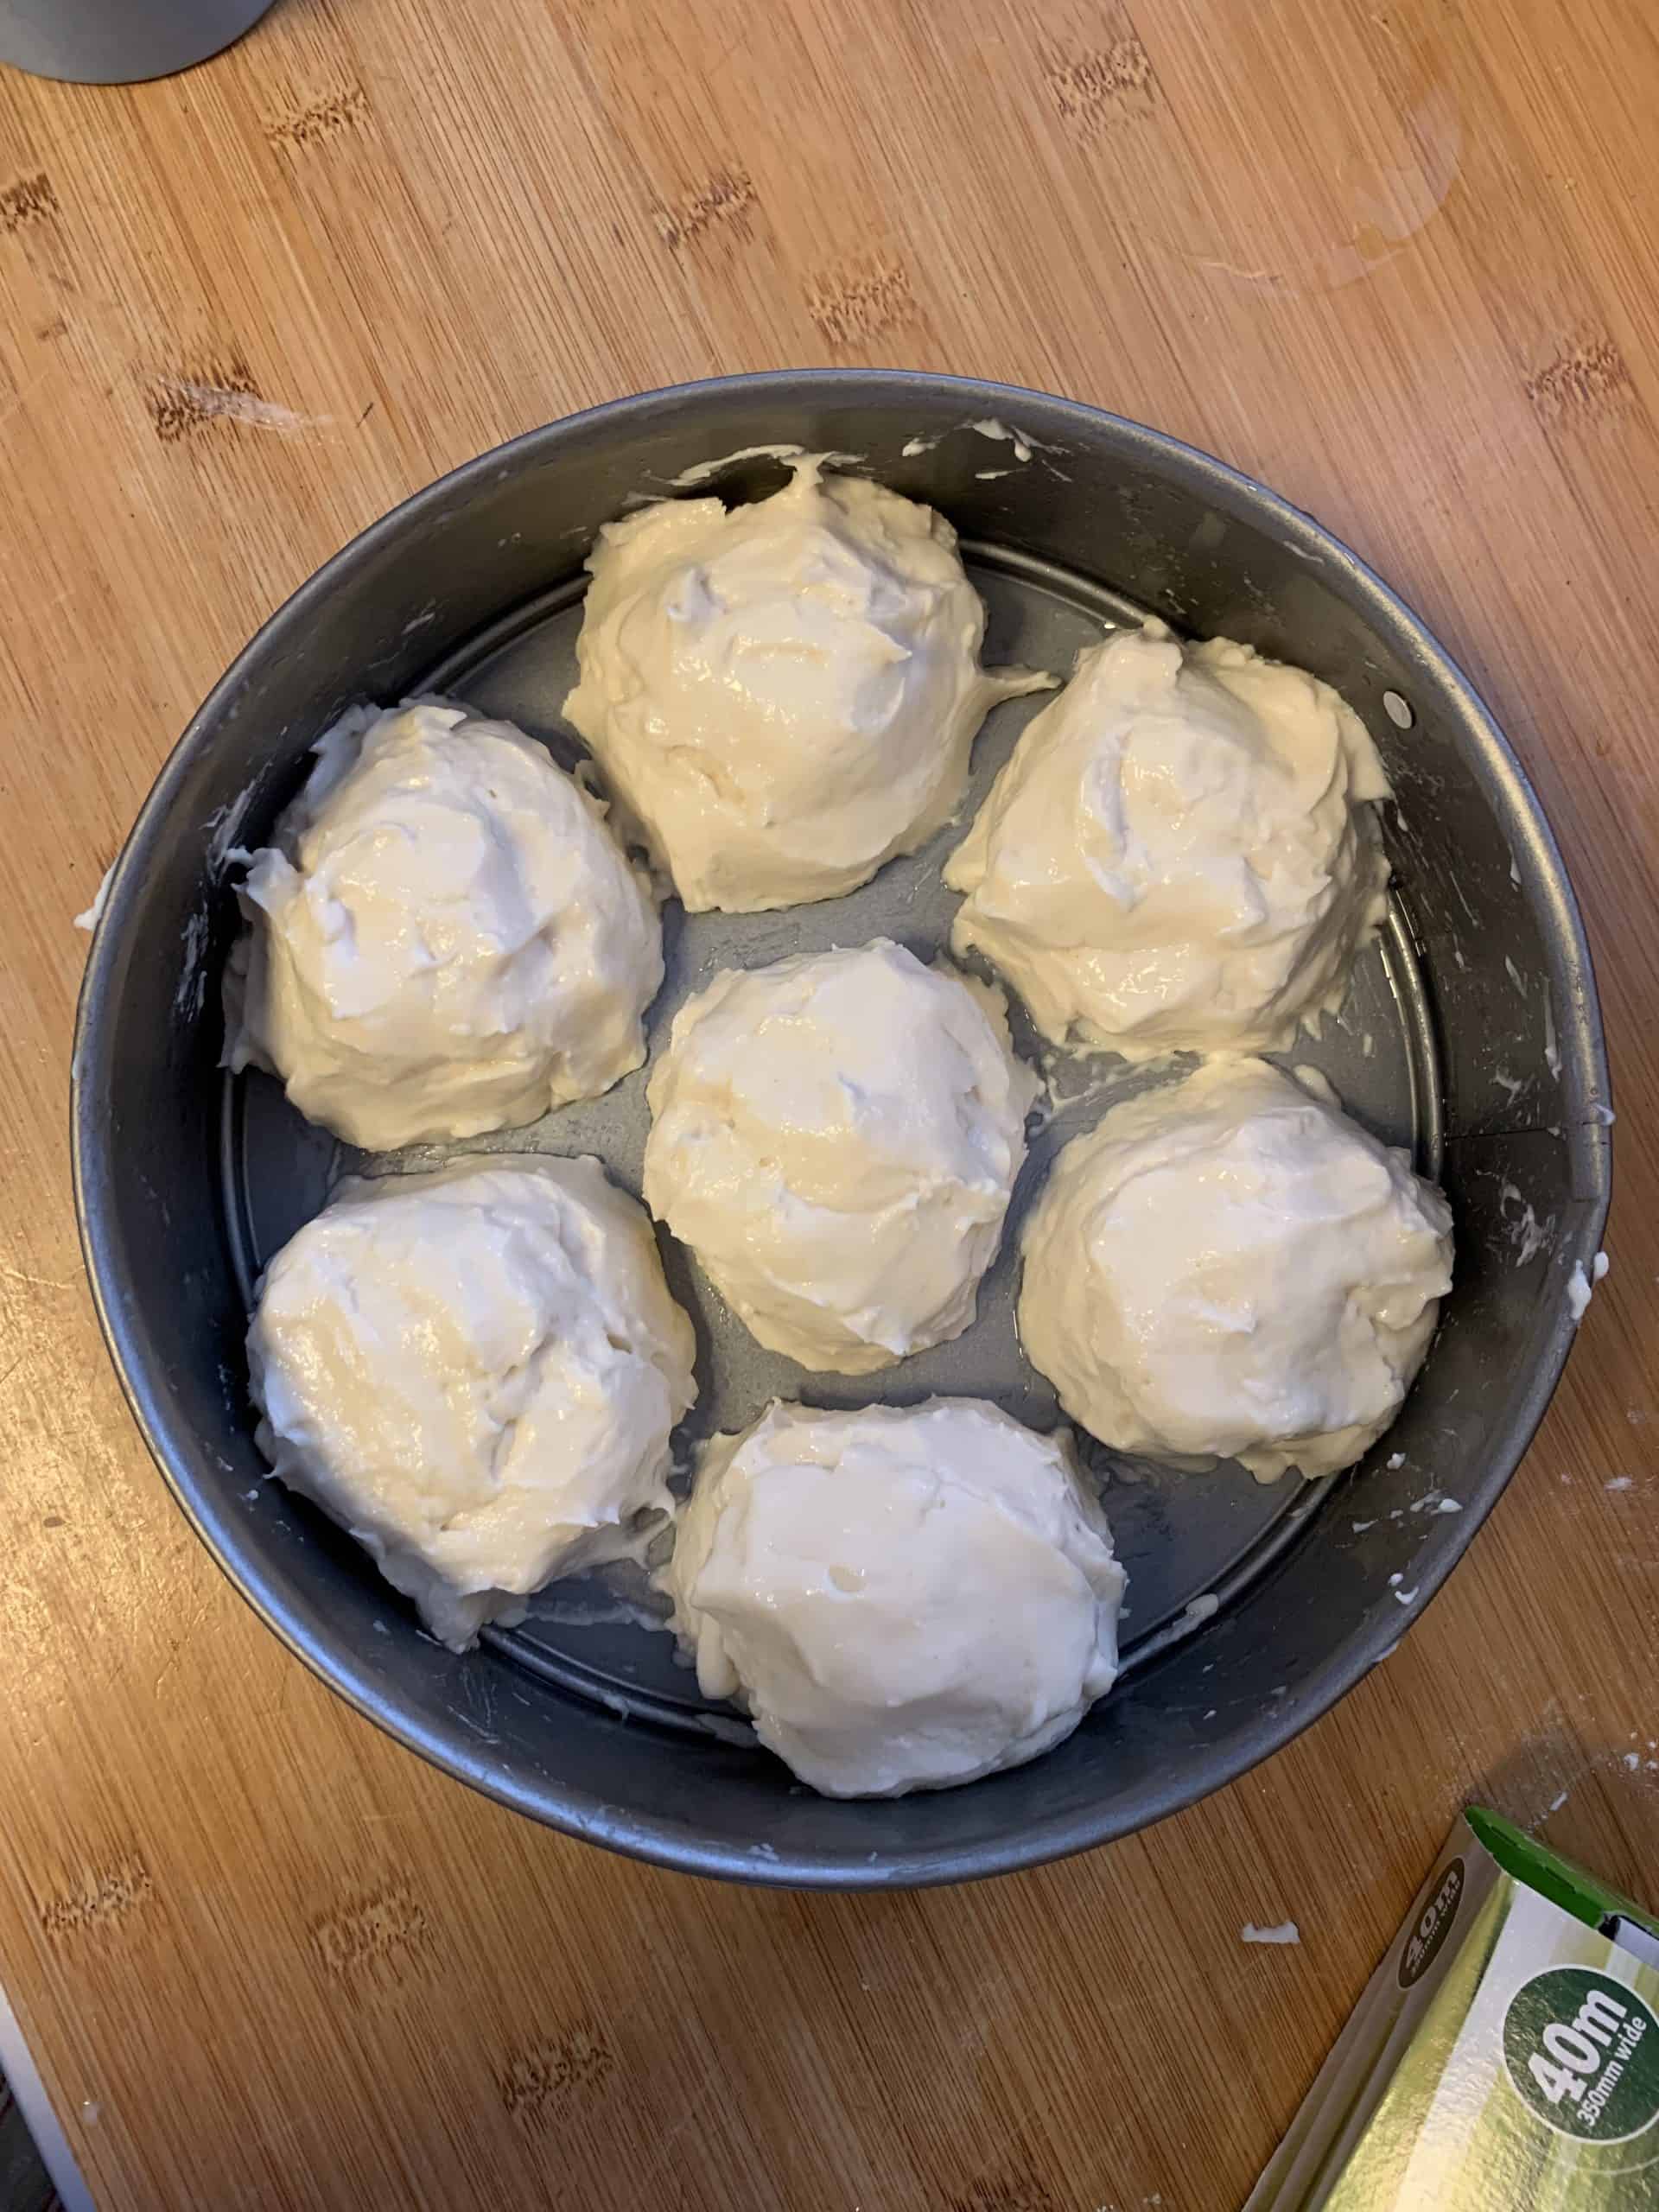
Once you have your thick batter, you need to create your rolls in a tin.
I use a deep, round cake tin as this is allows the bread rolls to expand upwards.
They also join together which is what means you can tear these rolls apart when cooked – the best feeling!
I used two spoons to ‘dollop’ the mixture into roughly 8 blobs, and then dipped my fingers in cold water and shaped the dollops into rolls.
You’ll find the dough is sticky but with oiled or wet fingers it can be easily smoothed into place, to look like this…
Proving gluten free bread rolls
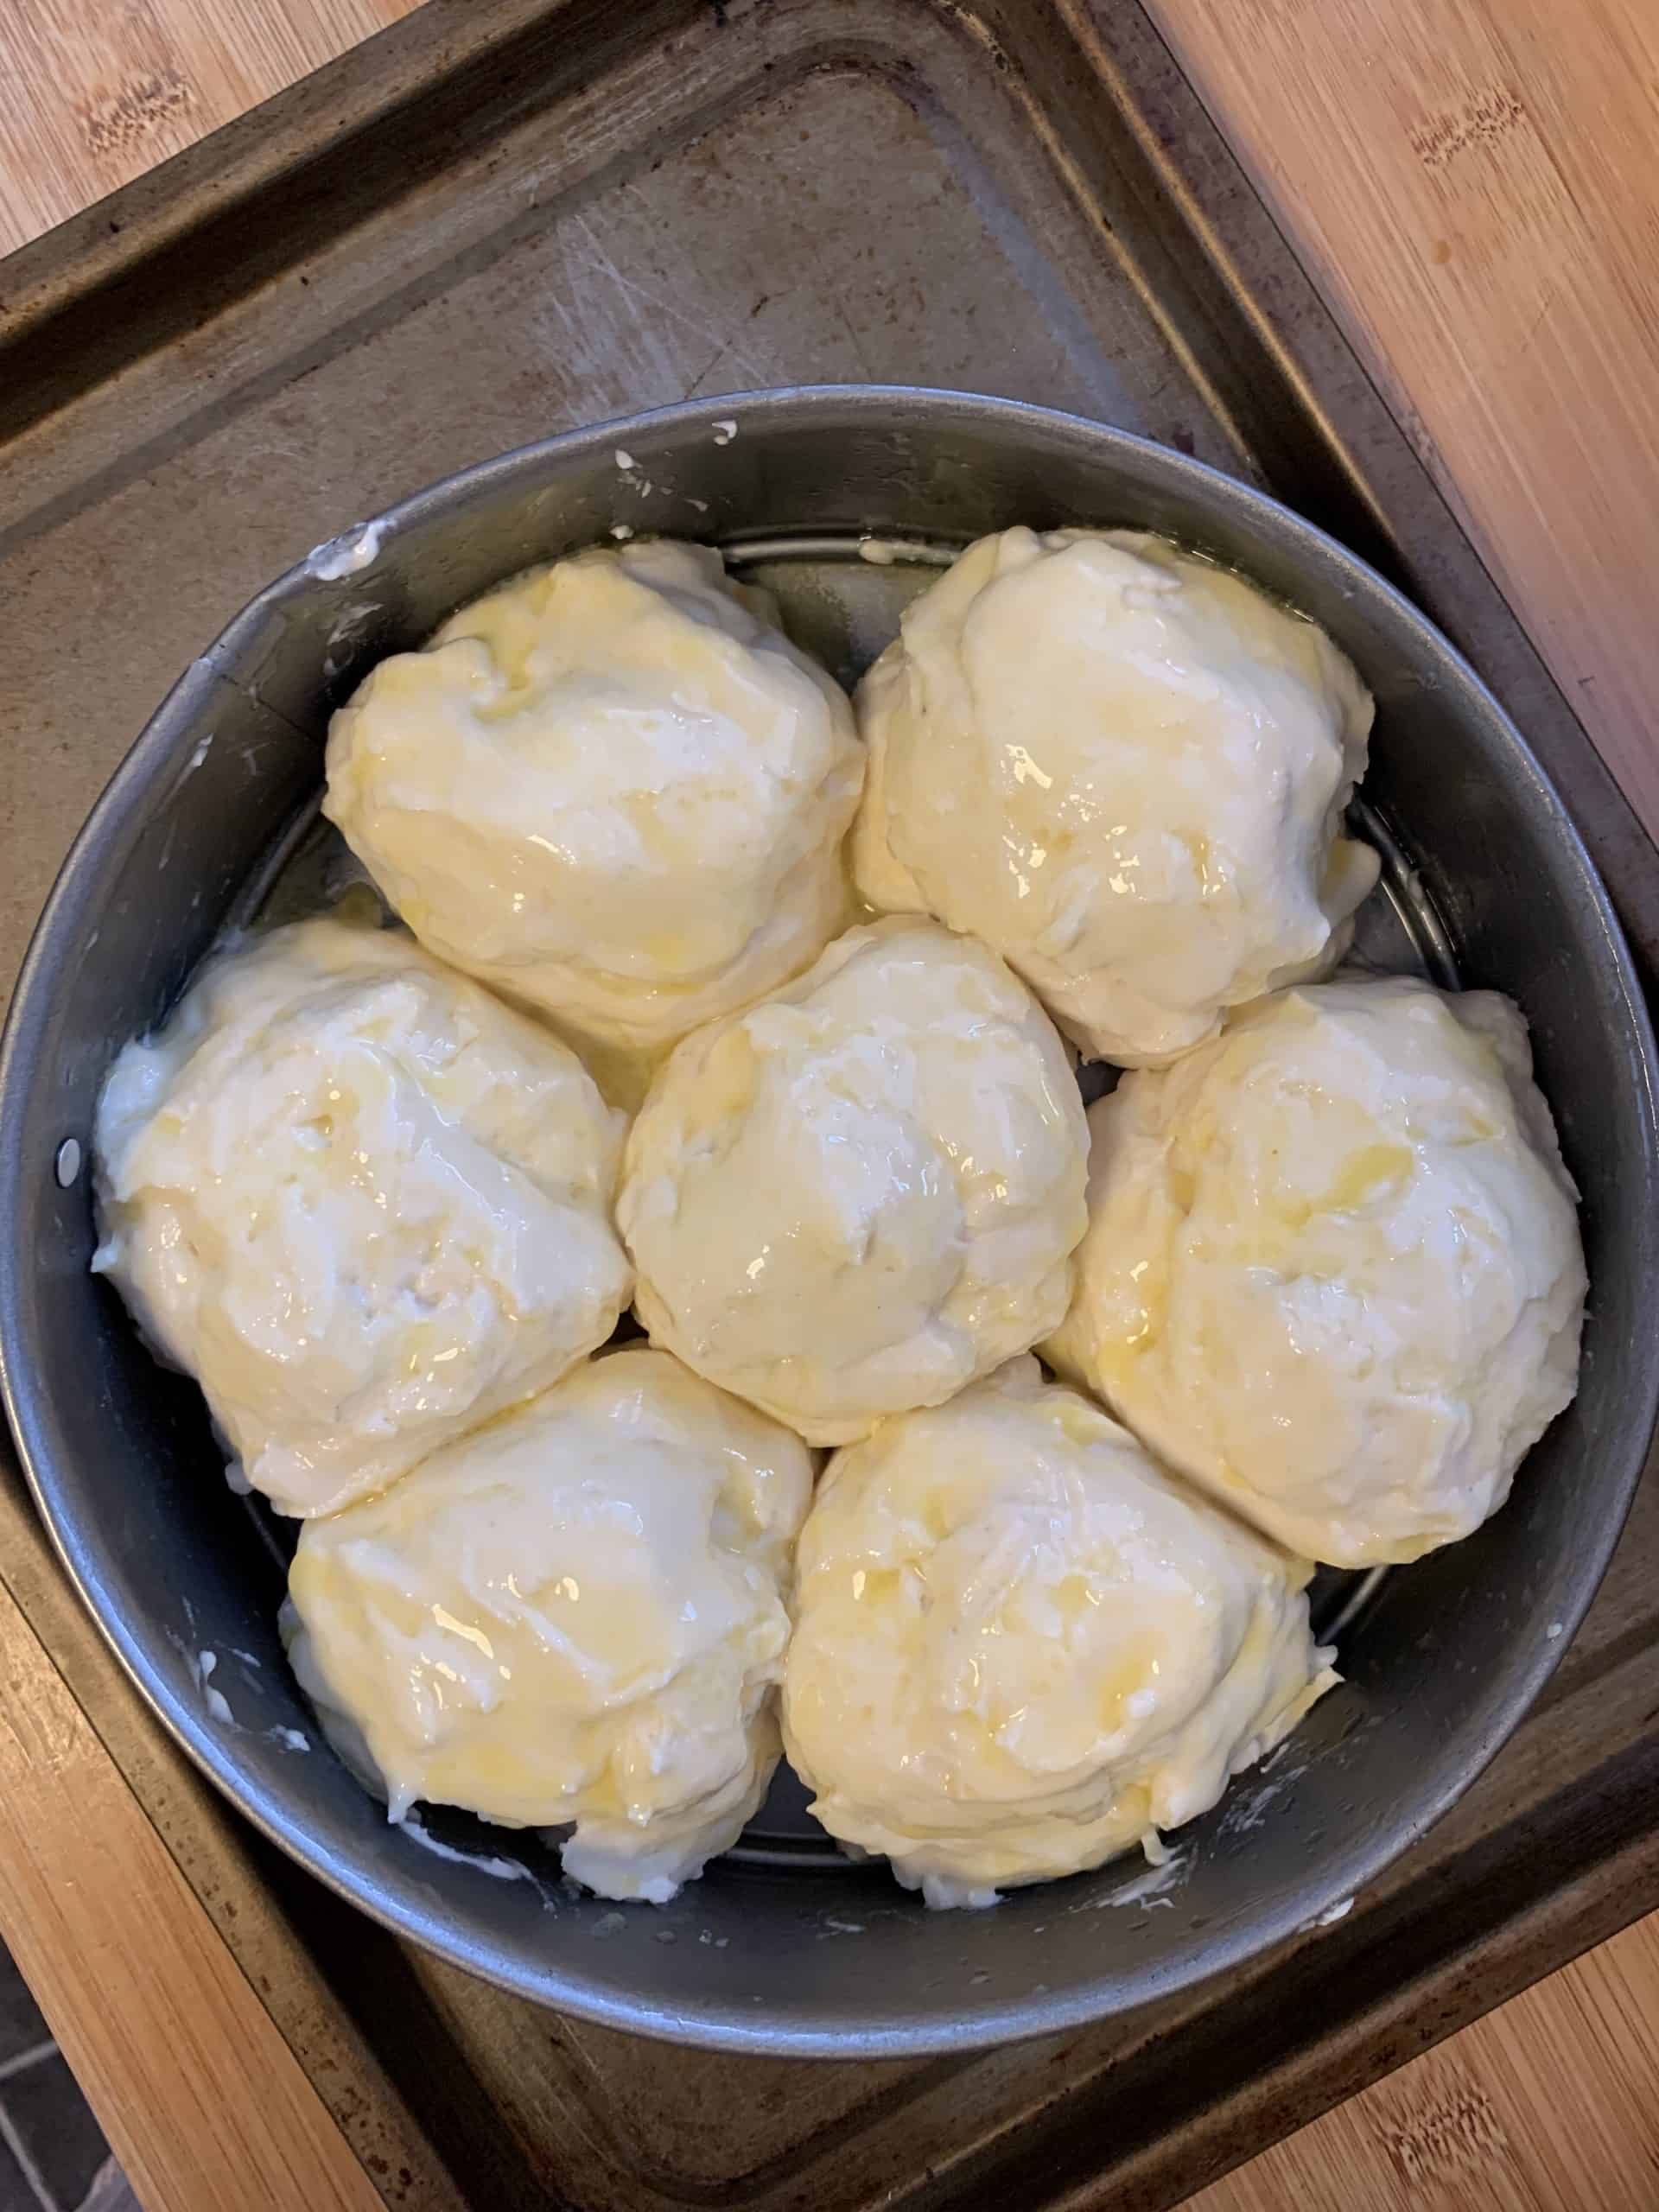
Once you have the rolls shaped, cover them loosely with oiled clingfilm and pop them somewhere warm to prove.
A lot of people put them in the oven with just the light on.
I personally have a lovely warm corner of the house where I hang the washing above a radiator, I pop them there with a towel over them and it works every time!
They should take around 40-45 minutes (might be quicker on a warm day / longer on a very cold day) and you want them to expand in size.
The rolls will be touching each other and will have puffed up like the photo below.
When they’re ready and you’ve brushed them with melted butter, it’s time to bake – here they are proved and ready for the oven…
Baking gluten free bread rolls
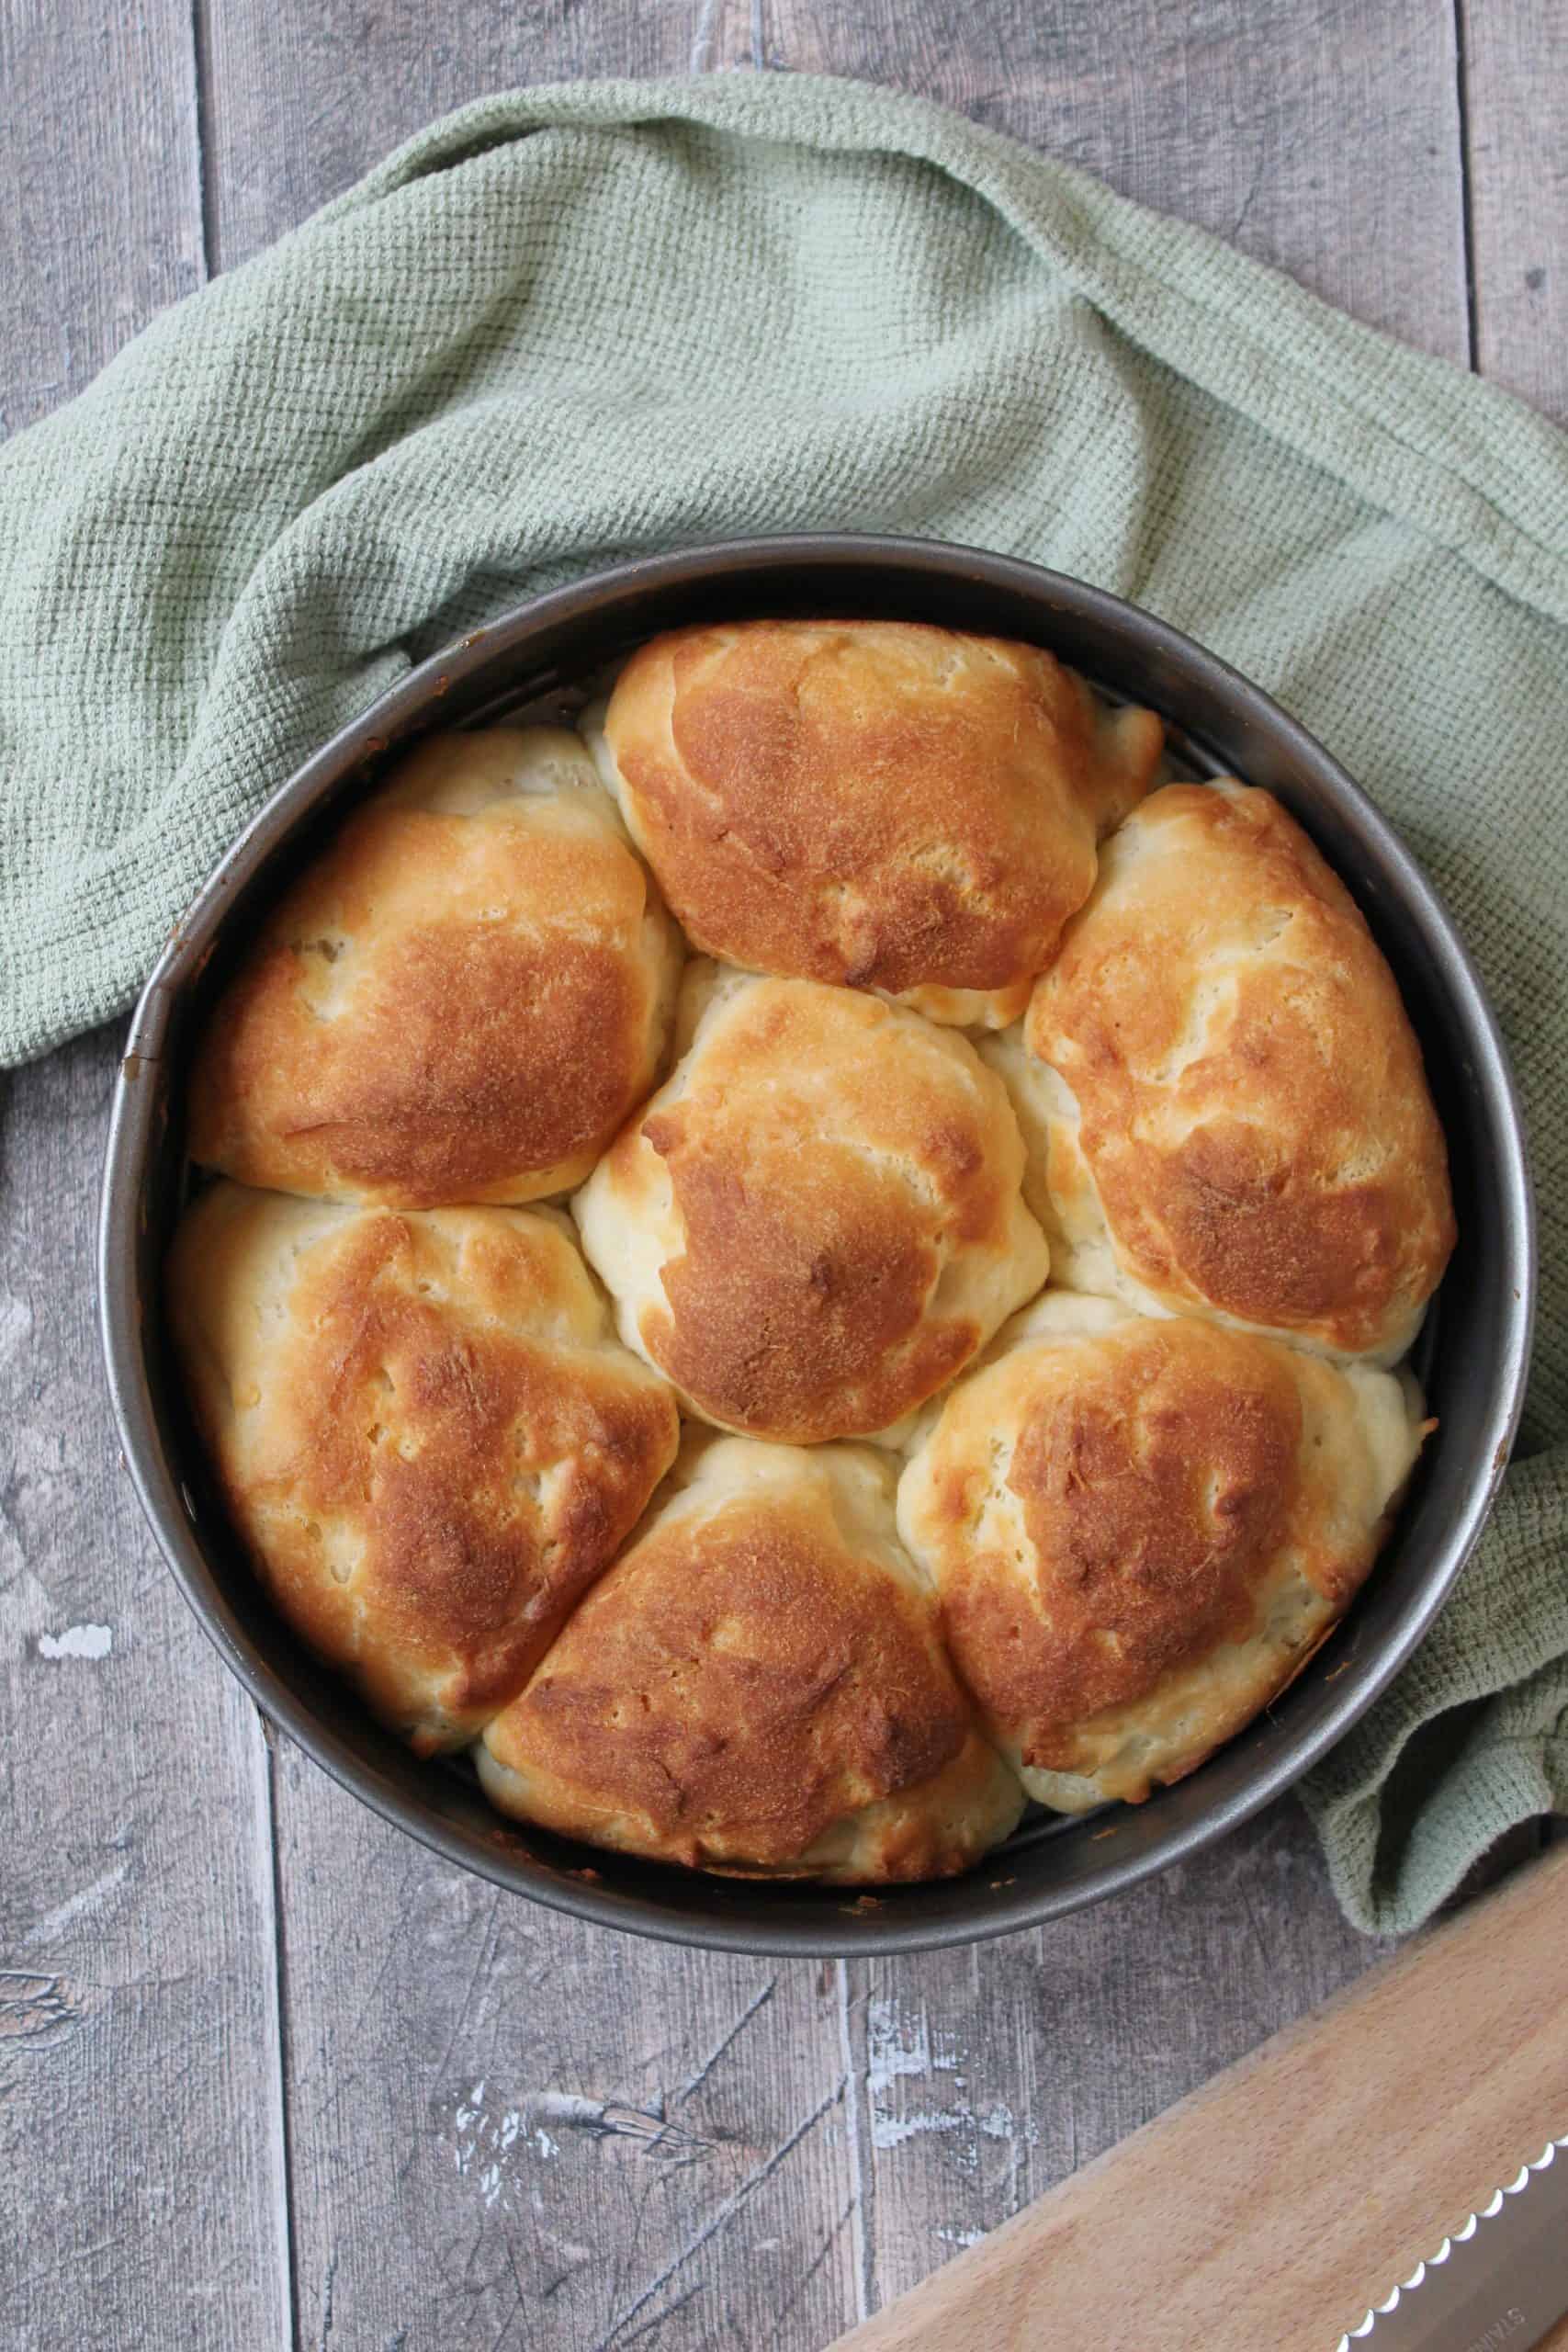
This is the really easy part of making my gluten free bread recipe – popping the bread rolls into the oven!
You’ll need to bake these for around 25-30 minutes until they are golden on top.
The tops of the bread rolls should also sound hollow when you tap them.
If you find the rolls are going brown too quickly, you can cover them with some tinfoil for the rest of the bake to prevent them burning.
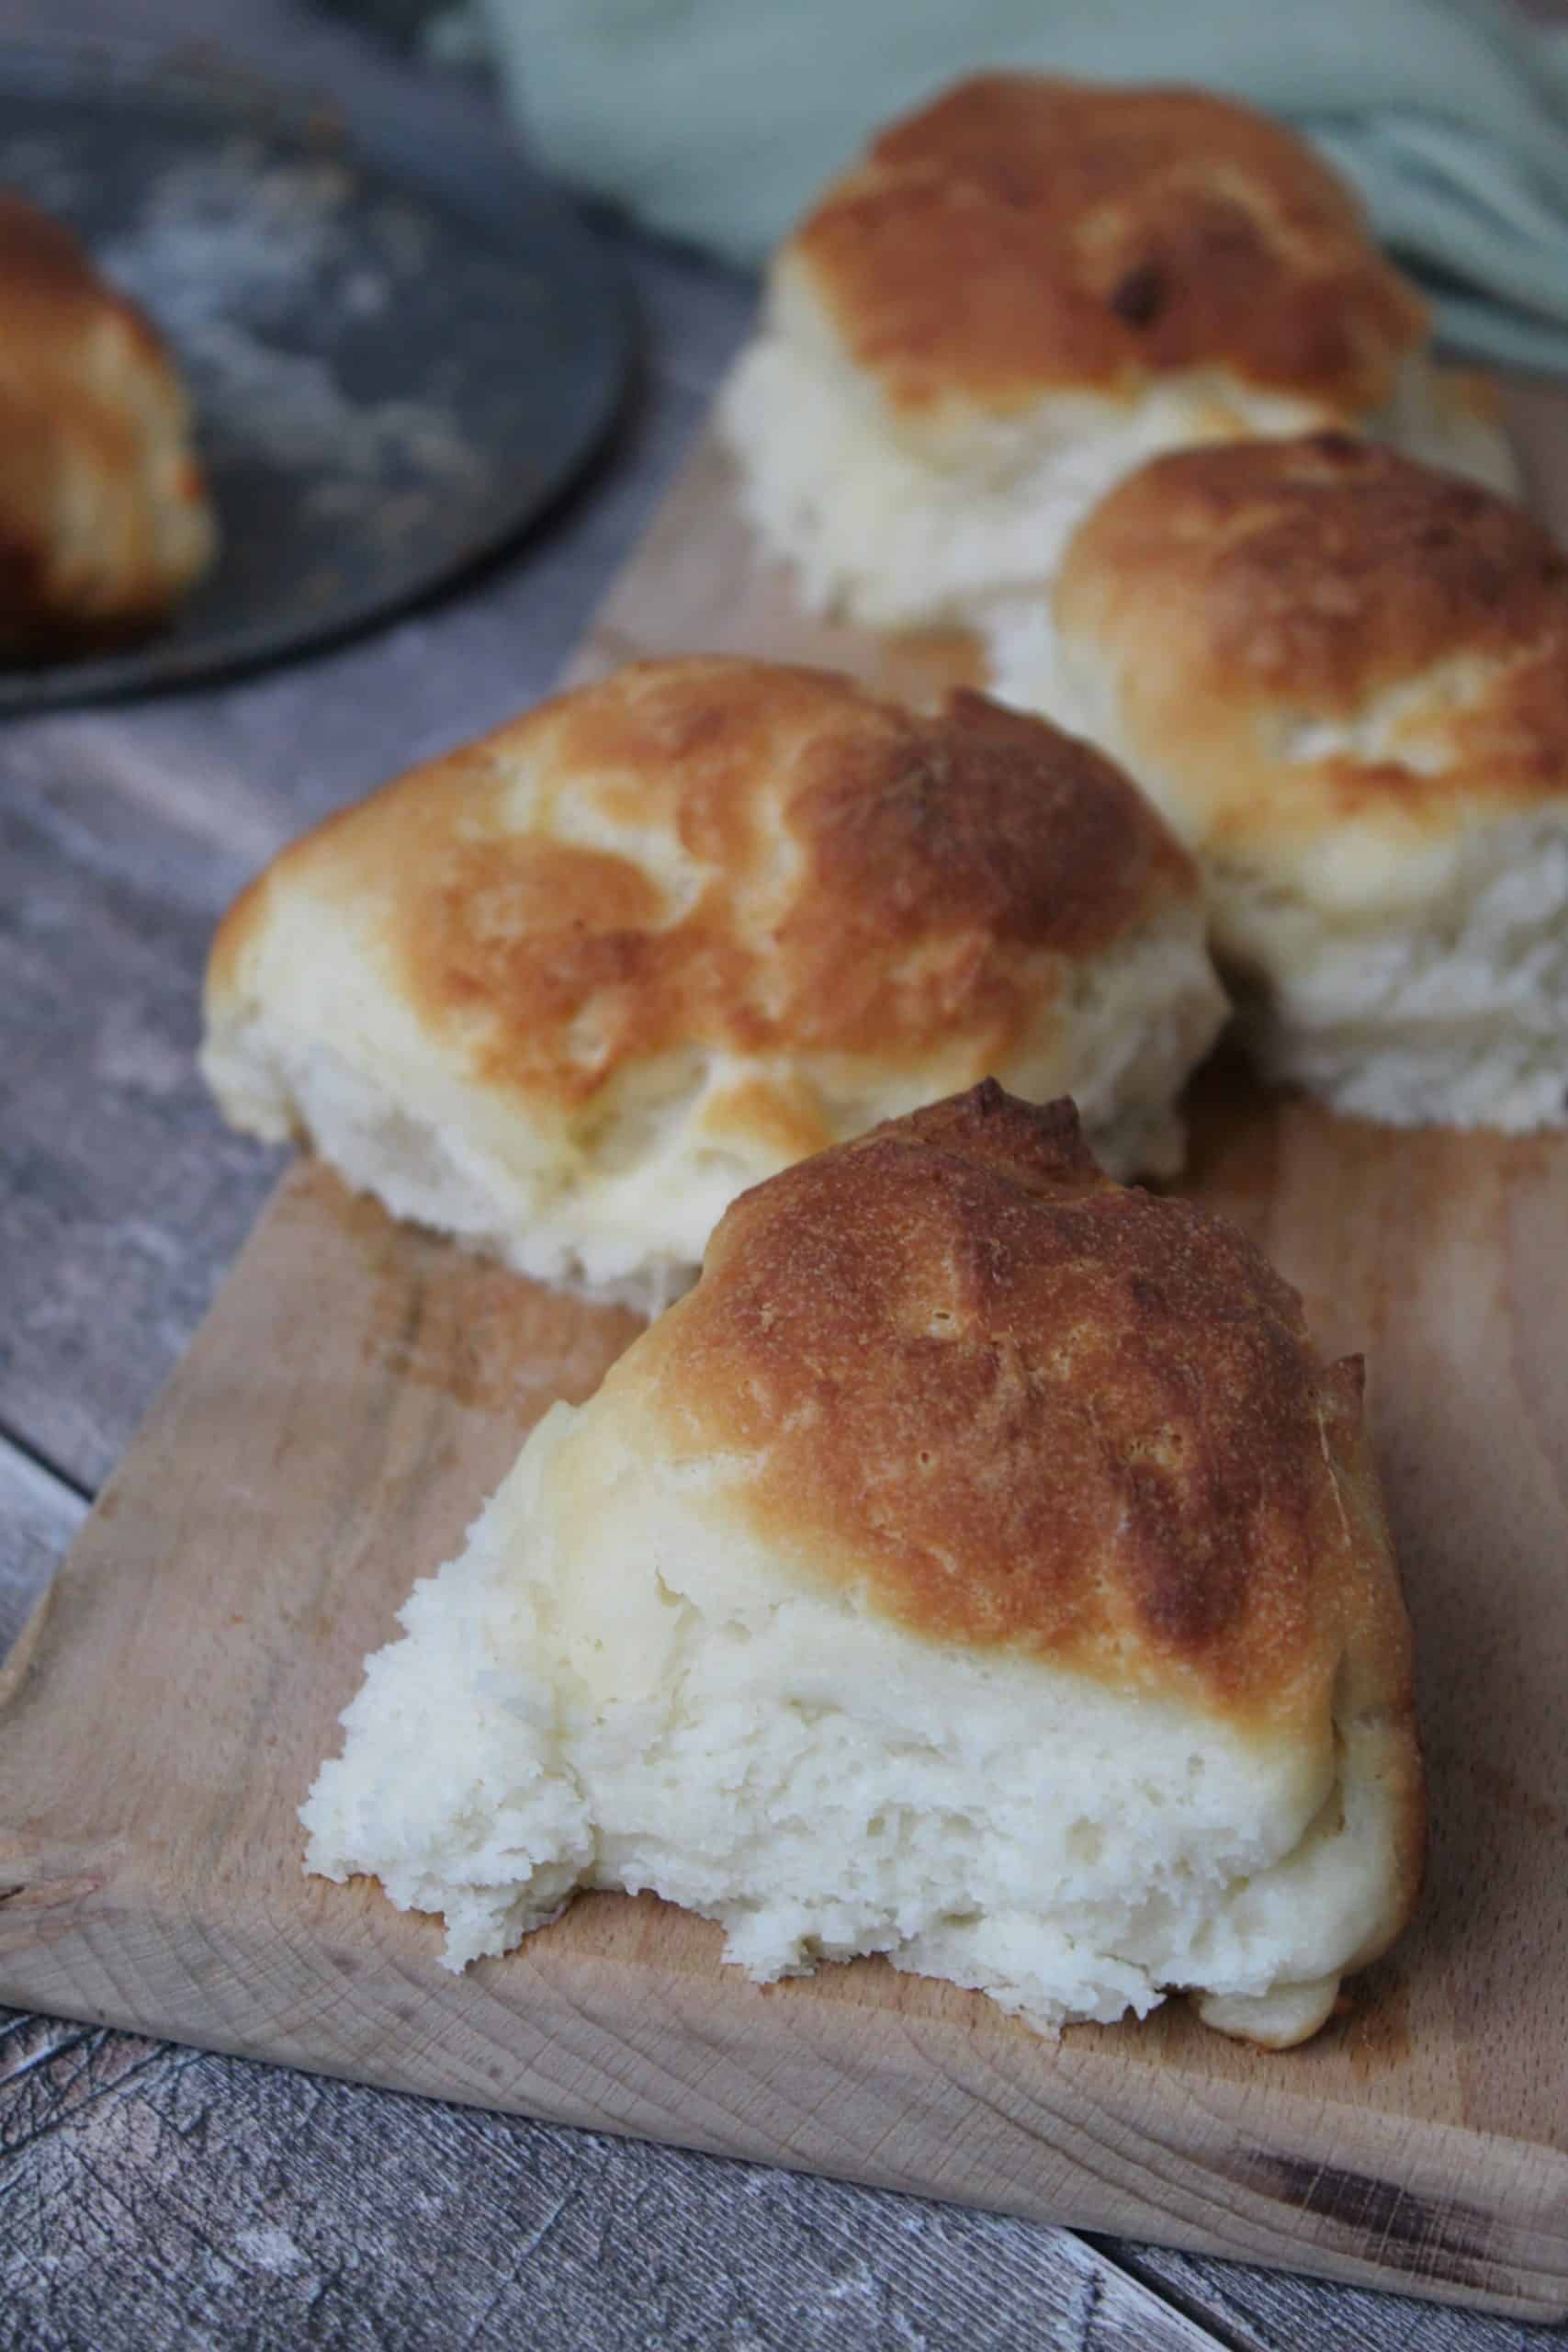
Once baked make sure you allow the rolls to cool for at least 15 minutes before tucking into them.
There’s a reason WARM not HOT bread is so tempting – if you eat them straight away you don’t give the gums time to set.
The gluten free bread rolls will be a much nicer taste and texture if you enjoy them when they’ve cooled slightly and are warm but not hot.
How to store these gluten free bread rolls
Once your gluten free buns are cooked it’s best to eat them fresh, within a few hours of them being baked.
They’re generally better on the day of baking but if you’re making them ahead of time, you’ll want to store them in an airtight container.
You can also freeze the rolls and defrost them as needed.
I’d recommend if you’re not eating them on the day of baking that you refresh them with a quick 5 minute blast in the oven before serving.
They make fantastic burger buns and sandwiches, and are perfect for serving up as dinner rolls with soup of stews.
My gluten free bread rolls recipe
This easy gluten free bread rolls recipe is simple to follow, uses basic ingredients, and creates four, hamburger-sized rolls.
As said previously, these are definitely best eaten when fresh from the oven and can also be frozen.
There’s also a handy step-by-step video here showing you in a bit more detail how to make these gluten free bread rolls:
If you make this recipe and love it, please do let me know by tagging me on my Instagram or using #theglutenfreeblogger. I love seeing your bakes!
And please do leave a review to let others know you loved it too! It would mean the world to me.
Gluten Free Bread Rolls -- CLONED
These gluten free bread rolls are easy to make and perfectly soft and squishy. Made in a tear-and-share way, these gluten free dinner rolls are best eaten fresh but also great for sandwiches or as burger buns. This recipe makes 8 gluten free bread rolls - you can halve it to make four but you'll need to use a smaller tin. These rolls can be frozen.
Ingredients
- 300ml milk
- 2 tbsp caster sugar
- 7g dried yeast
- 400g FREEE gluten free white bread flour
- 1 tsp xanthan gum
- 1 tsp salt
- 1 tsp apple cider vinegar
- 5 tbsp vegetable oil (such as rapeseed oil)
- 2 large eggs
- 20g unsalted butter (for brushing)
Instructions
- Measure out the milk into a small pan and warm it on a very low heat until it is at skin temperature - i.e. you can't really feel the heat when you dip your finger in. Remove from the heat and pour into a jug.
- Stir the sugar into the warm milk and until dissolved, then add the yeast and stir again. Leave in a warm spot for 5-10 minutes for the yeast to activate. It should form a lovely froth on top when it's ready.
- Add the gluten free bread flour, xanthan gum and salt to a large mixing bowl and stir to mix together.
- In a separate mug or bowl, add the eggs, oil and vinegar and lightly whisk to combine.
- Once the yeast/milk mixture is active (frothy), add it to the flour along with the egg/oil mixture. Using a wooden spoon, beat the mixture together vigorously to combine it into a thick, sticky dough.
- Oil a 23cm diameter round cake tin. Using a scoop or spoon, divide the dough into 8 pieces and arrange them with one in the centre of the tin and seven pieces evenly spaced around the edges. You'll want to make sure they have a little space between them. Dip your fingers in cold water and use them to gently shape the dough. The dough will be fairly sticky and difficult to handle but you can use wet fingers to smooth them into rough ball shapes. Don't worry about being too precious - I prefer the rustic look!
- Loosely cover the tin with oiled clingfilm and leave in a warm spot to prove. It will take about 40-45 minutes and the rolls should almost double in size.
- Preheat the oven to 200'C / Fan 180'C / Gas Mark 6. Remove the clingfilm and brush the tops of the rolls with the melted butter. Place the tin in the centre of the oven. Bake for 25-30 minutes until the tops of the rolls are golden brown. You'll know the bread is done if you tip it out of the tin and tap on each surface - it should sound hard and hollow. If you find the rolls go brown too quickly, cover with some tinfoil.
- Leave the rolls to cool in the tin on a cooling rack for at least 15 minutes before eating. Best enjoyed while warm and fresh, or allow the rolls to cool completely then freeze them.
Notes
Nutrition Information:
Yield:
8Serving Size:
1Amount Per Serving: Calories: 328Total Fat: 13gSaturated Fat: 3gTrans Fat: 0gUnsaturated Fat: 10gCholesterol: 55mgSodium: 330mgCarbohydrates: 42gFiber: 1gSugar: 3gProtein: 9g
Need some more gluten free baking inspiration?
If you want to have a go at some of the other gluten free bread recipes on the blog, why not give some of these a try? They’re perfect for baking away all of your troubles.
- My easy gluten free focaccia recipe
- Gluten free bread (loaf) recipe
- Yeast-free gluten free soda bread
- Gluten Free Flatbreads
If you do make this recipe please let me know! I’d love to see your photos using #theglutenfreeblogger, share them in my Facebook group or tag me on Instagram.
And if you have any recipe suggestions, please let me know in the comments what you’d like to see next!
Like this gluten free bread rolls recipe? Pin this recipe card below for later!

About the author
Sarah Howells is a UK gluten free blogger and author. She has been living with coeliac disease since 2002. Her debut recipe book, Delicious Gluten Free Meals, is out now in the UK and to pre-order in the US.


Beautiful soft rolls! I’ve made them twice in one week already. My gf son loves them. 100 times better than shop bought. Fluffy and light. I bake wheat bread regularly & we think these are better! Thank you for sharing the recipe!
Thanks for so much for this recipe. On my second attempt at making these I put them separately on a baking tray. That worked really well too,
Brilliant!
Xanthan gum is bio engineered garbage. It passes through the brain blood barrier as well. Not good to have in our bodies. I am sure you wont post this.
You’re more than welcome to not make this recipe if you don’t want to.